Fusion360 - Robot simulation / CAD to URDF
The best and easy way to create a robot URDF model is by
Creating its 3D model. We can use any CAD designing software for that.
Here I'm using Auto-desk Fusion 360, as it is free of cost for
Personal/Non-commercial use!
Step 1: Install Auto-desk fusion360.
Download and install Fusion360-Personal use from the
official website.
Follow this link to complete the installation process
https://www.autodesk.in/products/fusion-360/personal
Step 2 : Design a basic robot model in Fusion 360 .
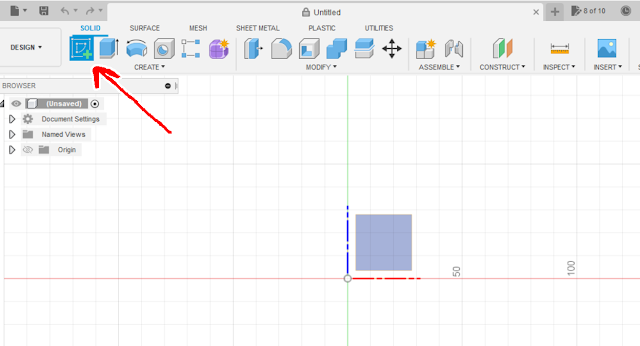
First use the sketch option in fusion360 to draw a rectangle
Create a a sketch for robot main body . here I have chosen a small rectangle as robot body .Once we have created the basic sketch model of the robot, We have to Exclude the sketch to create a 3D Body .
Once we have the 3D body of our robot we can do further modifications to
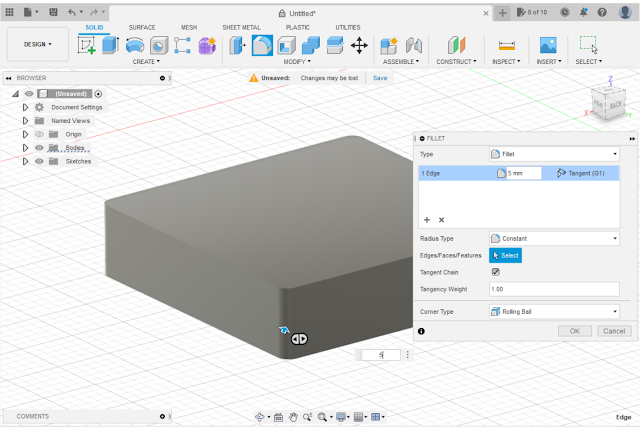
increase the aesthetics, to keep it simple I'm just using fillet tool
and giving a curvy feel to all the corners.
Once we have the body ready follow the same steps to create wheels for the robot.
Draw 2 circle of required diameter --> Extrude
"All the required parts for robot is ready !"
Step 3: Create Components from the body.
Now we have to create components fro the body parts .
Right click on the Bodies folder --> create components from bodies
Step 4 : Assemble components using Joints.
Now we have to assemble all these components together to make our robot .
We have to choose the right joint for each parts . in case if we have designed components like LIDAR , camera or any others sensors, Then we can use Rigid joint to assemble those components as we are not expecting any movement in those joints .
Here we have only wheels and base body so the joint type is revolute, as the wheels are supposed to be rotating .
Note : It is important to rename all components ! As Fusion to URDF plugin
expecting the base component with name "base_link" .
Here I have renamed the main body as base_link and wheels as wheel_left
and wheel_right .
During joint creation choose the wheel as first component and body as base_link(main body) as second component .
Step5: Correcting robot position and orientation.
Correcting robot position and orientation as per ROS standards is important as in ROS world the robot front is always in the x direction and wheels should touch the ground line.
Use the Move tool in fusion360 to adjust robot position and orientation.
Now we have completed the robot design and ready to create the URDF file from the robot model.
Step 6:Add Fusion 2 URDF plugin.
We can use the fusion to URDF python plugin to create the robot URDF for us .
follow this link to add fusion to urdf plugin !.
https://github.com/syuntoku14/fusion2urdf
In its read-me they have mentioned the rules and steps for this process.
Go to the above git repository and download the repository as zip file.
Extract the zip file--> open windows PowerShell --> cd into the fusiontourdf folder .
And run the command given below:
Copy-Item ".\URDF_Exporter\" -Destination "${env:APPDATA}\Autodesk\Autodesk Fusion 360\API\Scripts\" -Recurse
This will successfully add the fusion to URDF plugin to our fusion360.
Step7: Creating URDF using Fusion2URDF.
Now we have added the plugin to fusion360 , We can see the plugin in
Fusion360 --> UTILITIES --> ADD-INS --> URDF_Exporter
By just clicking on the plugin it will start creating the URDF and save it into the selected file location.
Once the process is completed it will show the above pop-up window ..
saying URDF created successfully !
Fusion360 to Gazebo :
Step8: Testing URDF using gazebo and Rviz.
We have successfully made the URDF file!
Copy the generated URDF folder (<design name>_description) to a ROS workspace .
or create a new workspace
$ mkdir robot_ws
$ cd robot_ws
$ mkdir src
paste the robot_description folder (URDF folder ) to src and build the workspace
$ catkin_make or $ catkin build
Then just run the robot launch commands to open gazebo / rviz visualization of
the URDF file .
$ roslaunch <design name>_description gazebo.launch
$ roslaunch <design name>_description display.launch


